Recently, I’ve been helping a client roll out an implementation of a new Helpdesk tool for tracking support calls. Rather than install the software locally on everyone’s individual computers, we’ve installed it on a server, and we’re using RDP (Remote Desktop) to connect to the server.
I’ve written a user guide about our process, but I’ve also been providing support for a group in our division, including many people who’ve never used RDP before. Some people work in the office and need to use a single RDP session while others work remotely and need to use two RDP sessions before they can log into the Helpdesk software. One RDP session is simple, but two RDP sessions are double the trouble.
If you’re new to RDP, or you’re thinking about working remotely, here are a few tips and tricks to get you started.
Note: These tips are for using RDP in a Windows environment.
Logging into a remote computer
- In the Windows Start menu, type remote in the search box, and select Remote Desktop Connection.
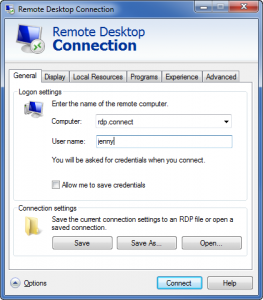
- In the Remote Desktop Connection dialog box, on the General tab, enter the name of the computer you want to connect to and your username.
(Talk to your IT person if you don’t know these.) - Click Connect.
Setting the default display options
- In the Remote Desktop Connection dialog box, click the Display tab.
- Drag the slider all the way to the right to see the remote computer in full screen.

- On the General tab, click Save.
 Sharing local drives and devices
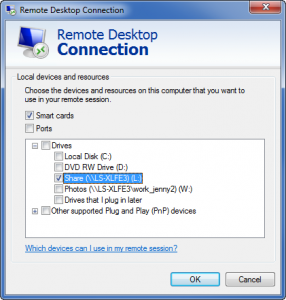
- In the Remote Desktop Connection dialog box, click the Local Resources tab.
- In the Local devices and resources section, click More.
- Select the drives and devices you want to make available on the remote computer.
- Click OK.
- On the General tab, click Save.
Making a shortcut to a specific remote computer
- In the Remote Desktop Connection dialog box, enter the details of your connection (computer, user name, display options, shared drives and devices).
- Click Save As.
- In the File name field, enter a name for the shortcut.
- Choose a location for the shortcut (such as the Desktop).
- Click Save.
Using the tabs
When you use RDP at full screen, a tab appears at the top of the screen. If you can’t see the tab, hover your cursor near the top of the screen and the tab should slide down. You can pin tabs in place if you don’t like them sliding up out of sight.
If you’re using more than one RDP session, the tabs are stacked, one on top of the other. You can drag the tabs sideways to see the computer name on the tab below or if the minimize and maximize buttons are hidden.
Switching Between RDP sessions
If you’re running more than one RDP session, you might want to switch between the windows.
- To minimize a window, click the Minimize (
 ) icon.
 - To restore a minimized window, click the RDP button in the taskbar.
- To shrink a window, click the Restore down (
 ) icon.
 - To restore a shrunk window, click the Maximize (
 ) icon.
Got any burning questions about using RDP? Ask away and I will try to answer.


